
Bulk table editor — update, copy and delete data in batches
How to update, copy or delete many rows of a table at once: the bulk editor's three modes, their recipes and the preview before applying.
Bulk table editor
The bulk table editor lets you apply the same operation to many rows of a table at once, instead of editing them one by one: recalculate one or more attributes, copy rows into another table (existing or new), or delete rows that meet a condition. Each operation can be scoped to a subset of rows with a WHERE-type condition, is previewed before it runs, and is saved as a project resource so you can apply it again later.
Access
The bulk editor always opens from a table, in either of these two places:
- Resource Manager: in a table's pop-up options menu, the Bulk table editors entry.
- Layer menu: tapping a table layer, Table… submenu, Bulk table editors entry (next to Duplicate and Empty table).
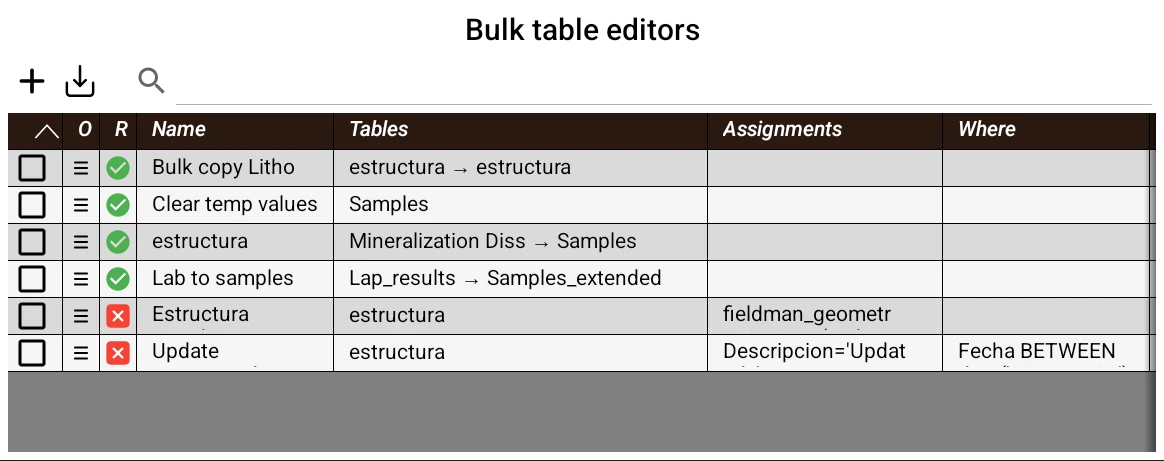
Both paths open the same manager: a list of saved bulk editors in a grid like the Resource Manager, with a search box to filter by name. Each editor shows these attributes:
- Selection box: select several editors to use the buttons at the top on them.
- Editor options: the row menu lets you edit, duplicate or delete a saved
editor and export it as an
.fmrfile. If the current table differs from the one saved in the editor, the menu also offers to apply it to or from the current table without changing the saved editor. The option is disabled and marked "(incompatible)" if the tables have no equivalent columns. - Resource type: shows whether the editor is compatible with the table from which you opened the manager (see Compatibility between tables at the end of this chapter).
- Name, Tables (source, or source → target in Copy), Assignments (field mapping), Where (condition) and Modified.
Tap a row to run that editor on the table from which you opened the manager. You can preview and confirm the operation before applying it (see below).
At the top are  New,
New,  Import,
  Export and
  Delete. They work as in the Resource Manager. Bulk editors are always imported and exported as
 .fmr files.
The editor screen
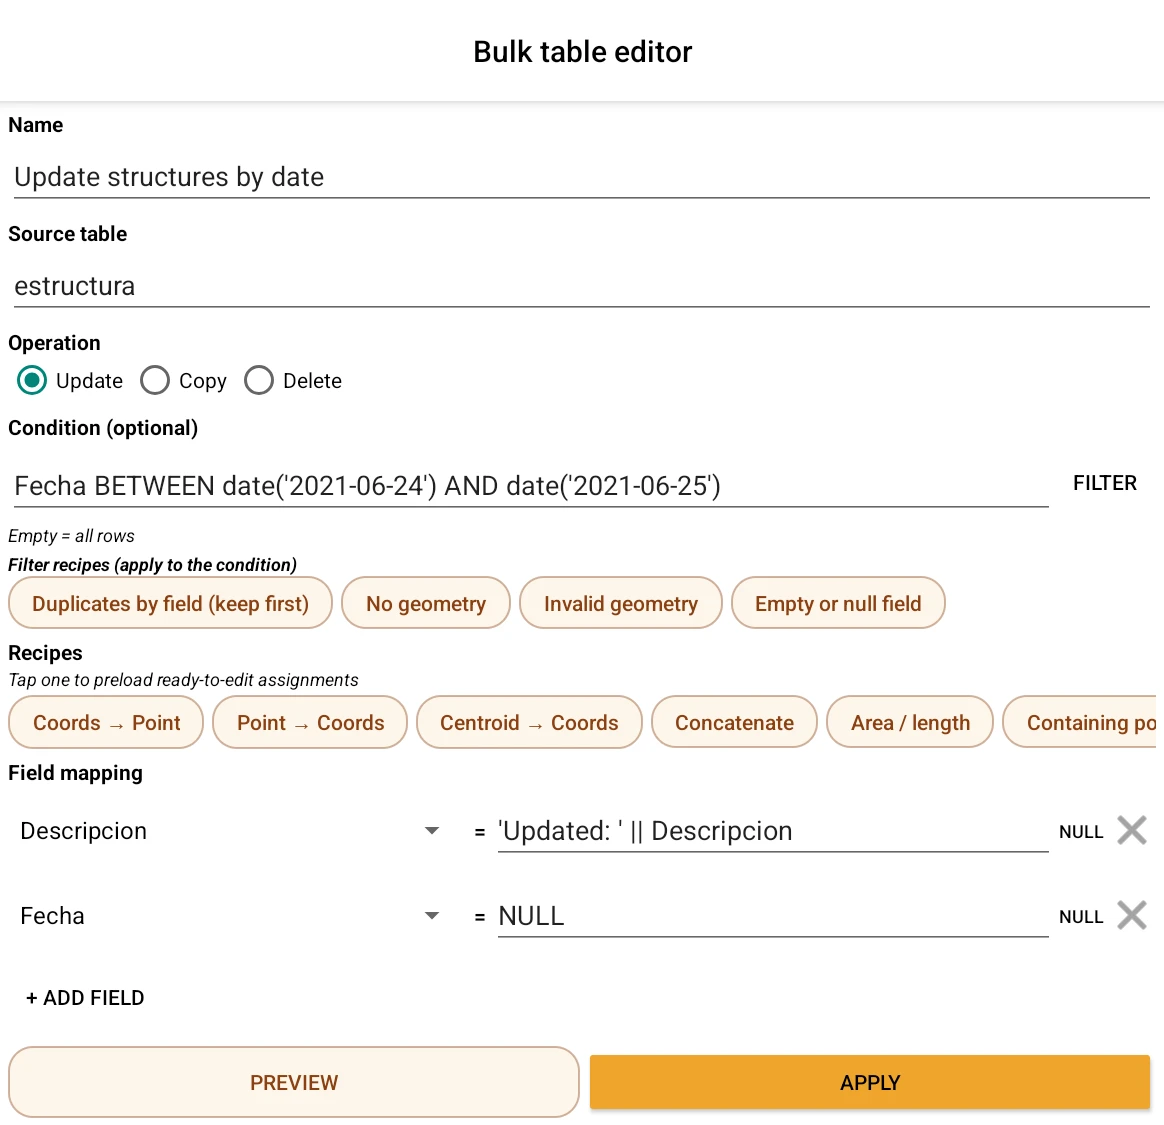
Creating or editing a bulk editor opens a full screen with:
- Name of the editor (to identify it in the list).
- Source table, with autocomplete over the project's tables.
- Operation: the three modes, Update, Copy and Delete, explained below. Switching modes does not lose what was typed: each mode keeps its own mapping and condition, so you can build an update and a delete in the same editor without losing either one.
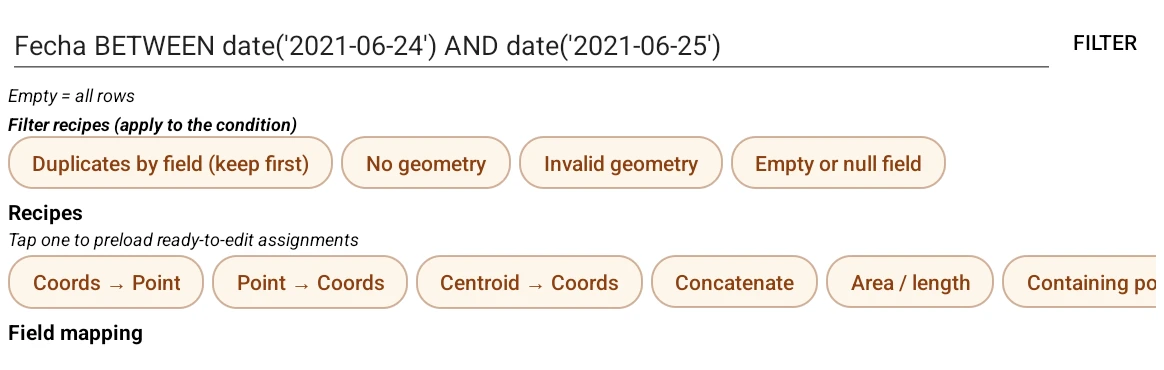
- Condition (a WHERE-type text box): filters which rows of the source the operation reaches. Empty, it reaches all of them. Below it there's a button to pick a filter already saved in the project and bring in its condition, and a row of condition recipes with shortcuts for common cases (see below).
- The Preview and Apply buttons: preview builds a grid with the result without touching the data; apply runs the operation for real, in the background, and does not close the window — it leaves everything ready to preview/apply again (for example, fix the condition and apply again on what's left). Only the Close button closes the screen; Save persists the editor as a project resource without running it.
Preview
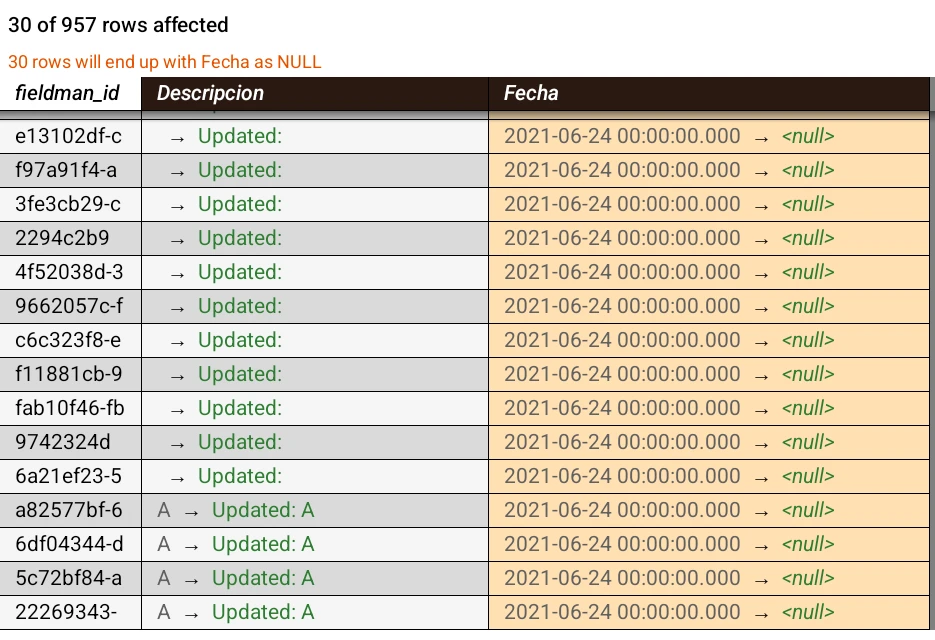
Before applying, Preview shows a grid with the actual result of the operation (it uses the condition and mapping exactly as written, no need to save the editor first):
- Header with the number of rows reached out of the total (for example, "128 of 4,320 rows reached").
- In Update, each cell of a column being changed shows the current value and, next to it, the new value. In Delete, the reached rows appear struck through. In Copy, the value each row would be inserted or updated with is shown directly.
- Cells that will end up blank (
NULL) after the operation are highlighted in a different color, and above the grid it shows how many rows or fields will end up that way — useful for spotting, for example, a coordinate column that couldn't be transformed. - A toggle lets you view all the table's rows or only the ones reached by the condition (the latter is the default view in Update and Delete; in Copy the grid already shows only what's going to be inserted or updated).
Update mode
Recalculates one or more attributes of the rows reached by the condition. Each row of
the field mapping defines a target column and the SQL expression that will
calculate its new value; several columns can be mapped in the same editor. To blank a
particular column, that row's NULL button writes the NULL value as the
expression — leaving the expression blank, instead, makes that mapping row be ignored
entirely (that column is not updated).
Before applying, you're asked to confirm the number of rows that will be updated; the action cannot be undone.
Copy mode
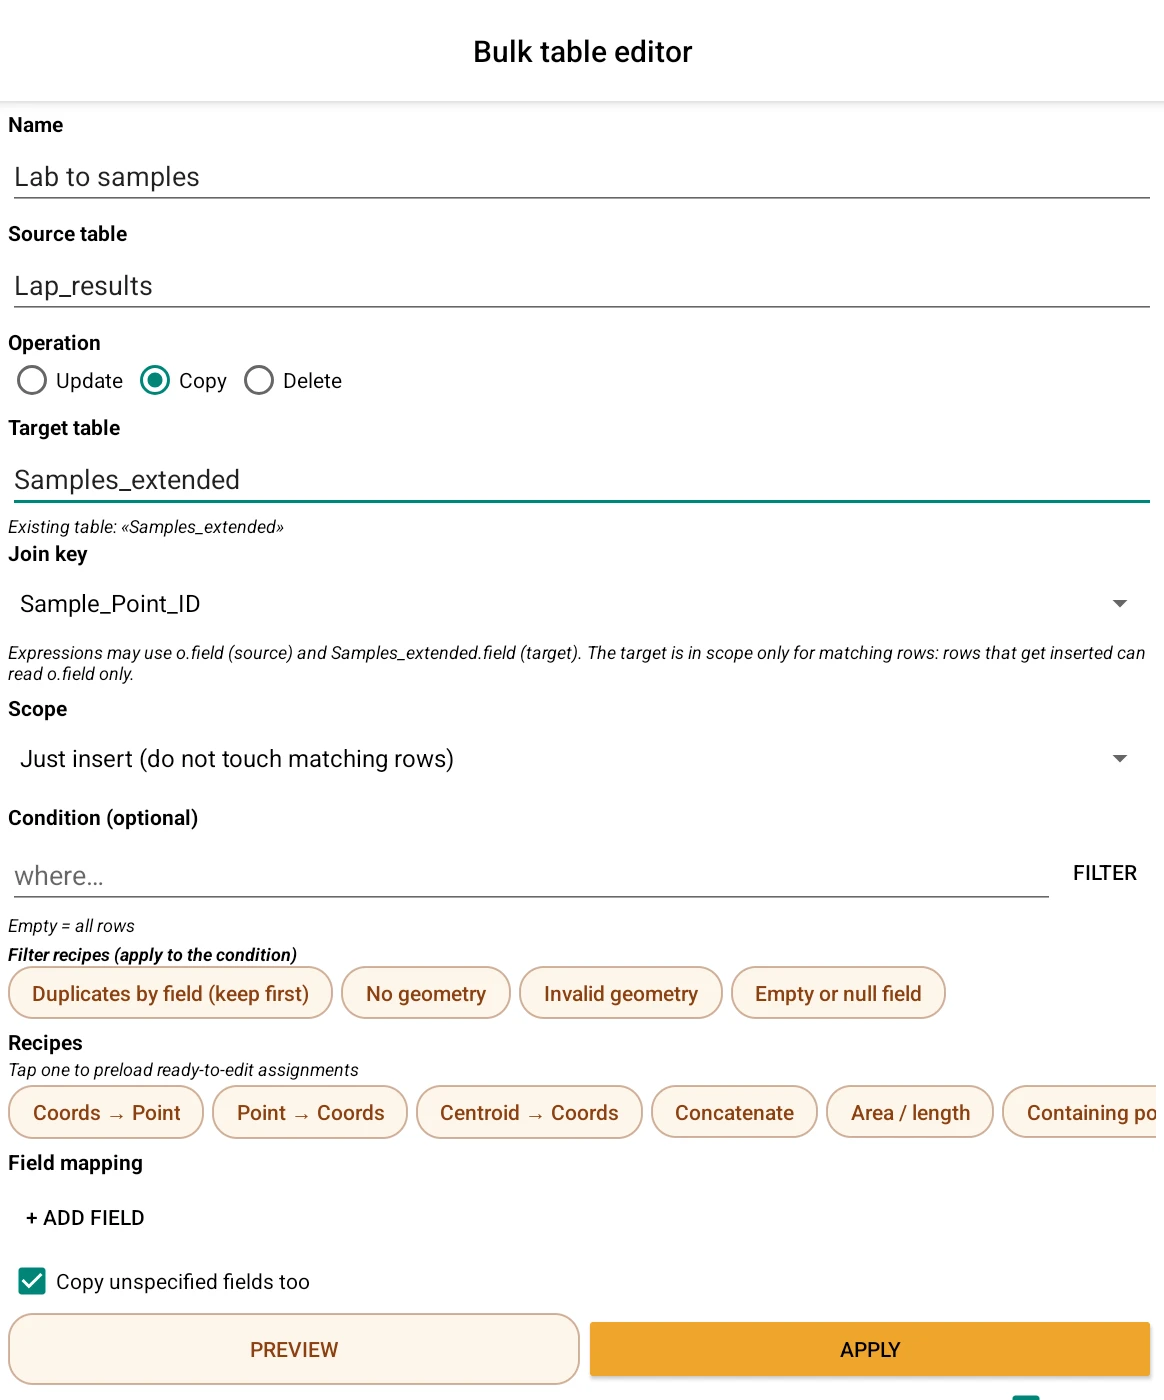
Copies the rows reached by the condition into another table, which can be an existing table in the project or a new table created on the spot. It adds three controls of its own, in addition to the field mapping:
-
Target table: typed or picked with autocomplete. If the name doesn't exist yet, it shows "Will be created: «name»"; if a table with that name already exists, "Existing table: «name»".
-
Join key: a column present in both source and target that identifies the same row in both tables (for example, a sample or drillhole code). With a key chosen, a source row that matches a target row by that column is treated as a row to update; a row that doesn't match, as a new row to insert. Without a key (the "— None (insert only) —" option) there's no way to recognize repeated rows: every reached row is inserted as a new row, even if an equivalent one already exists in the target.
-
Scope (only visible with a key and an existing target table): decides what to do with each of the two groups of rows above:
- Just insert: the rows that match the target are left untouched; the new rows are inserted.
- Update and insert (default): the matching rows are updated; the new rows are inserted.
- Only update: the matching rows are updated; the new rows are not inserted.
The Copy confirmation dialog also clarifies, with "Only update" or "Just insert", that the row count shown corresponds to everything reached by the condition and does not break down how many of those will match the target — that distinction is visible in the preview, cell by cell.
-
Copy unspecified fields too (checked by default): the target's columns that are not in the mapping but have a same-named column in the source are copied anyway, with the source's value; unchecked, those columns are left blank in the new rows and untouched in the rows being updated. This control is what makes "Copy" with no mapping typed at all equivalent to duplicating the full table (with the same columns), and unchecked it covers the opposite case: bringing in only the specific fields that matter into an existing table, without overwriting the rest of its content.
In the mapping, Copy's expressions can use o.field to reference a column of the
source and, when there's a join key, target.field to read the value the matching
target row already has — this second form is only available in the rows that are
going to be updated: rows being inserted as new can only read from the source.
If the source table's geometry and the target table's geometry use different coordinate systems, the geometry column's mapping is automatically suggested with the matching transformation; if the transformation isn't exact (for example, a non-geographic coordinate system, or one missing the required definition), a warning shows that the affected geometries will end up blank or only reinterpreted, not transformed.
When copying into a new table, applying it asks whether the table should be created by cloning the full structure of the source table (all of its columns, whether or not each one has a mapped value) or with just the mapped fields (a smaller table, with only the columns that were written).
Before applying, you're asked to confirm the number of rows reached; the action cannot be undone.
Delete mode
Permanently deletes the source table's rows reached by the condition; an empty condition deletes all the rows in the table. It has no field mapping (nothing to calculate), only the condition. Before applying, you're asked to confirm the number of rows that will be deleted; the action cannot be undone.
Note: to empty an entire table at once without going through the bulk editor, the quick Empty table entry in the Table submenu is still available; and to duplicate a full table as-is, Duplicate is still available. The bulk editor covers the same result with more steps (choosing a condition, mapping, preview) — for the simple case of "empty" or "duplicate everything, no conditions" those quick entries are still more direct.
Recipes
Both the mapping row and the condition box have, below them, a row of recipe buttons: shortcuts that build the SQL expression for you, only asking for the specific data they need (columns, coordinate system, etc.). What each recipe builds stays as editable text, just as if it had been typed by hand.
Expression recipes (add rows to the field mapping):
- Coords → Point: builds the point geometry from X/Y coordinate columns (and Z/M if the table has them).
- Point → Coords: the reverse — dumps the point's coordinates into columns.
- Centroid → Coords: dumps the geometry's centroid coordinates into columns (for lines or polygons).
- Concatenate: joins the content of two columns into a third one, with an editable separator.
- Area / length: calculates the geometry's area (in hectares) or length (in meters), depending on the table's type.
- Containing polygon attribute: brings, into a new column, an attribute from the polygon table that geographically contains each row (for example, assigning the block or geological domain name to each sample based on the polygon it falls in).
- Classify by breaks: builds a range classification (for example, high/medium/low grade) from a list of breaks with their label and a default value for what falls below every break.
- Normalize text: cleans up a text column (trims spaces, converts to uppercase, and blanks out the empty string) — useful before using it as a join key.
- Stamp provenance (Copy mode only): fills in, in target columns, the source table's name and/or the copy date — to later know, in a table that consolidates several source tables, where each row came from.
Condition recipes (write the condition box; apply to all three modes, since the condition always filters the source table):
- Duplicates by field (keep the first): builds a condition that reaches only the rows repeated by a column's value, leaving out the first occurrence of each value — mainly meant for Delete (cleaning up duplicates after a campaign).
- No geometry: reaches the rows with no geometry loaded.
- Invalid geometry: reaches the rows whose geometry is invalid.
- Empty or null field: reaches the rows where a chosen column is empty or blank.
Compatibility between tables
A saved bulk editor stays associated with the tables it was built with, but it can be applied to any compatible table: one that has the columns the mapping's expressions need. That's why the manager (the list of editors for a table) marks each editor as compatible or incompatible with the table it was opened from, and the row menu offers applying a saved editor to or from the current table when that combination is compatible, without needing to edit or duplicate it.
You've read enough. Try it with your own project.
20 days free, with your data. If you get stuck: the manual — and us.
Secure payment with Stripe · Cancel anytime.