
Export to SHP, TAB, Excel and GeoTIFF (and import into your project)
The resource manager: import and export geological data in standard formats, edit table structure and calculate fields.
Export to SHP, TAB, Excel and GeoTIFF (and import into your project)
Resource Manager
As mentioned earlier, projects are stored in folders, and all vector data and metadata of the project are stored in a single file called database.fmp. Therefore, all resources stored in different formats must be imported and exported within this database. Once imported, it is no longer necessary to keep the source files in the device's storage. On the contrary**, raster image files must not be deleted**, since the application will always read directly from them when rendering the map, importing only their references. Importing and exporting are done using the Resource Manager.
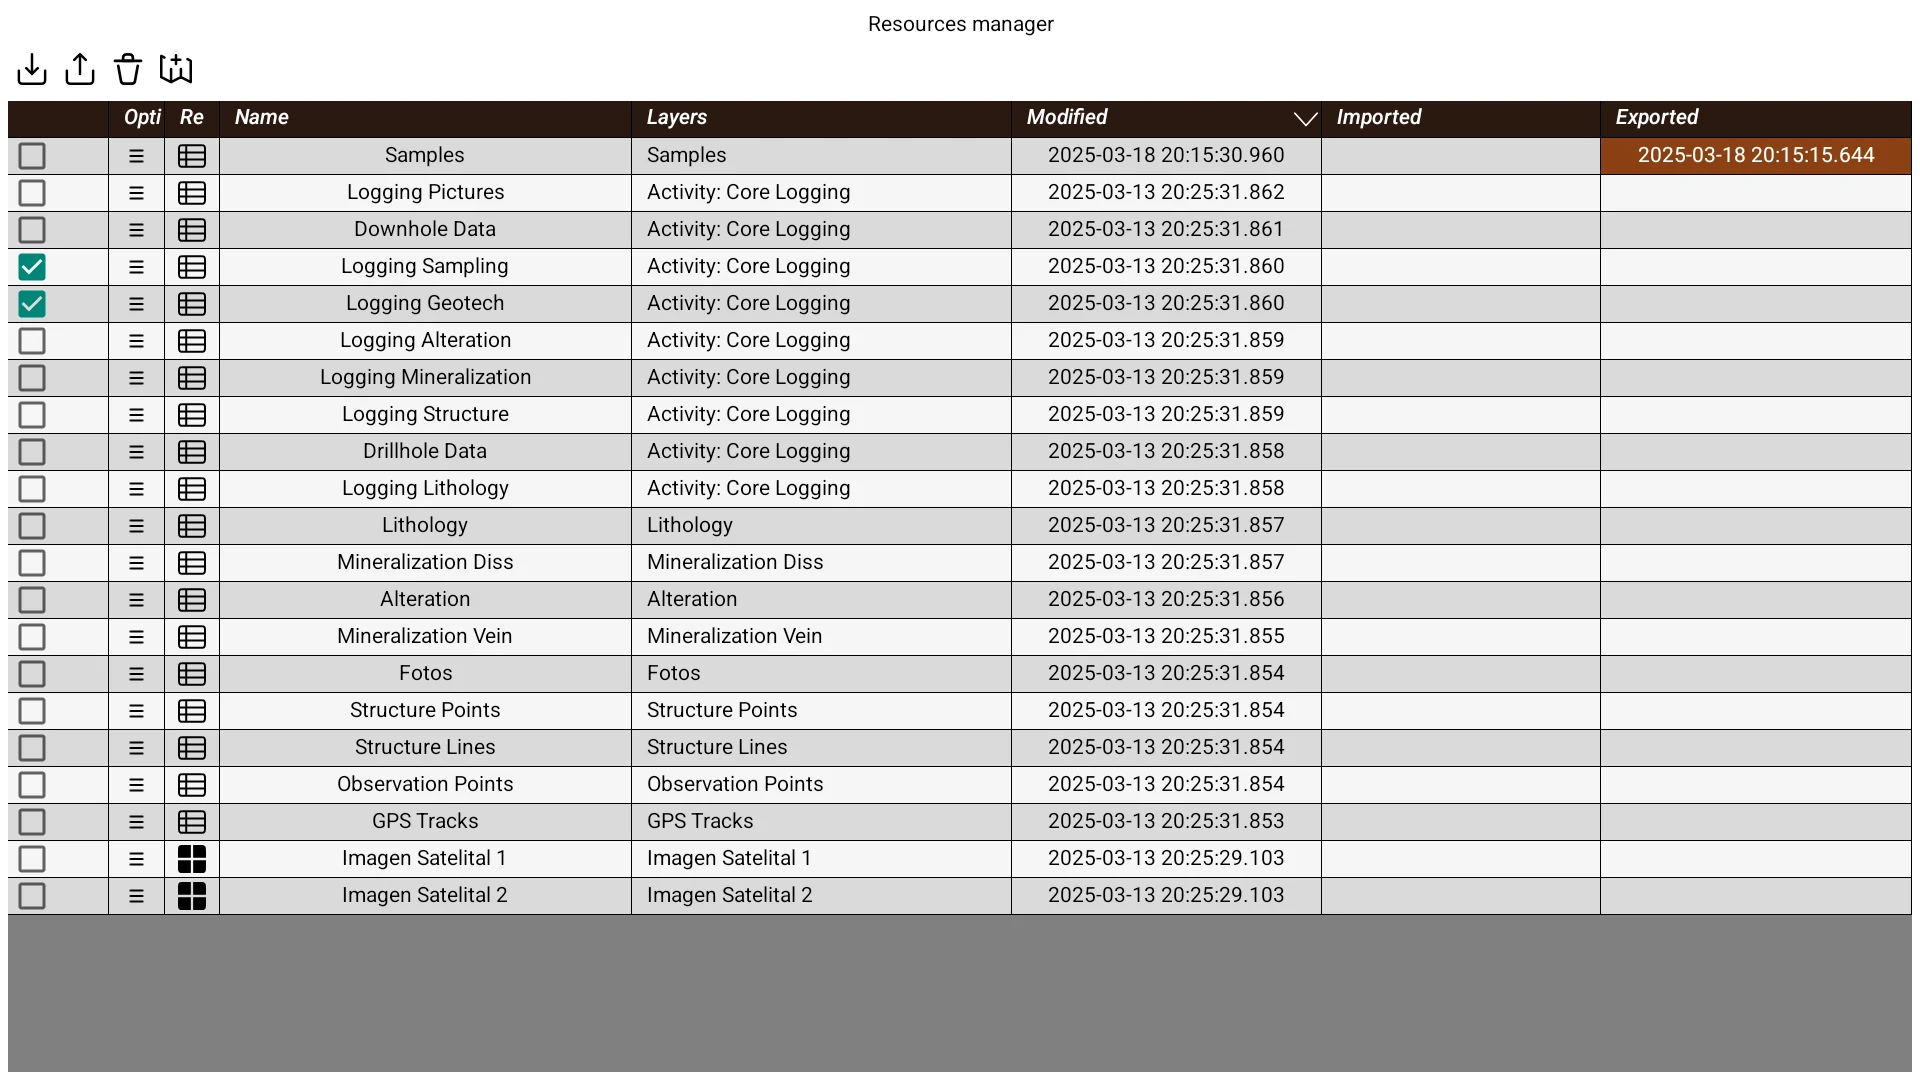
This window is accessible by pressing the  button at the bottom of the layer menu. The resource list is shown in a resizable grid. To change the column width, drag your finger over the headers; to change the row height, drag vertically from the header of the first column. If you tap a header, you can sort the rows by the corresponding attribute. These attributes are:
- Selection box: Allows selecting multiple resources to apply actions to them from the top button bar. (Some actions are only available when items are selected).
- Resource options: Pressing this button opens a pop-up menu with the following actions:
- Export to a file: Opens the file selection window to export the resource.
- Delete : Removes the resource from the project. This action cannot be undone.
- Edit table: Available when a single table is selected. Opens the table editor to modify its structure: attributes, data types, and projection.
- Empty table: Removes all the content of a table.
- Duplicate: Opens the Duplicate table dialog, which asks for a name for the copy and, if the table has an assigned export filter, offers the option Apply export filter (checked by default) to copy only the tuples matching that filter; unchecked, the entire table is duplicated with all its content. The new table keeps the internal tuple identifiers, the coordinate system (SRID), the supported geometry type, and the dimensions.
- Bulk table editors: Opens that table's bulk editors manager, to update, copy, or delete rows in bulk (see Bulk table editor).
- Export filter: Allows selecting a filter, which will remain permanently associated with the table: each time that table is exported, only the tuples that meet the filter will be saved. Tables with an assigned export filter are marked with a characteristic mark in the resource list
 .
.
- Resource type:
 Table.
 Raster.
 WMS service.
- Name: Name assigned to the resource.
- Layers: List of layers where the resource has been added in the current activity. If it is also used in another activity, it will be indicated as “Activity: ”.
- Modified: Date and time of the last modification made to the structure or content of the resource. It may also coincide with the moment of its creation.
- Imported: Date and time of the last import of the resource.
- Exported: Date and time of the last export. If the modification date is later than this, the cell will be highlighted.
You can scroll vertically or horizontally over the grid by dragging your finger over the rows. Tapping a row adds the resource as a layer in the current activity and automatically returns to the activity's interface.
At the top of the window is the action button bar. Some buttons only appear when one or more resources are selected. The available actions are:
 Import: Opens the file browser to select one or more files. The supported formats for tables are: .tab, .shp, .kml, .kmz, .gdb, .gpkg, .xls, .xlsx, .xlsm and .csv. For raster: .tif, .tiff, .jpg, .bmp, .png, .ecw, .jp2, .j2k, .pdf and .grd. Other resources can also be imported, such as ArcGIS's .lyrx and .lpkx styles or the native .fmr. The particularities of each format, on import and on export, are in Format specifications.
 Export: Exports all selected resources. This action opens a dialog that indicates the destination folder and warns that the exported resources will replace the files that already exist in that folder. It also offers the following options:
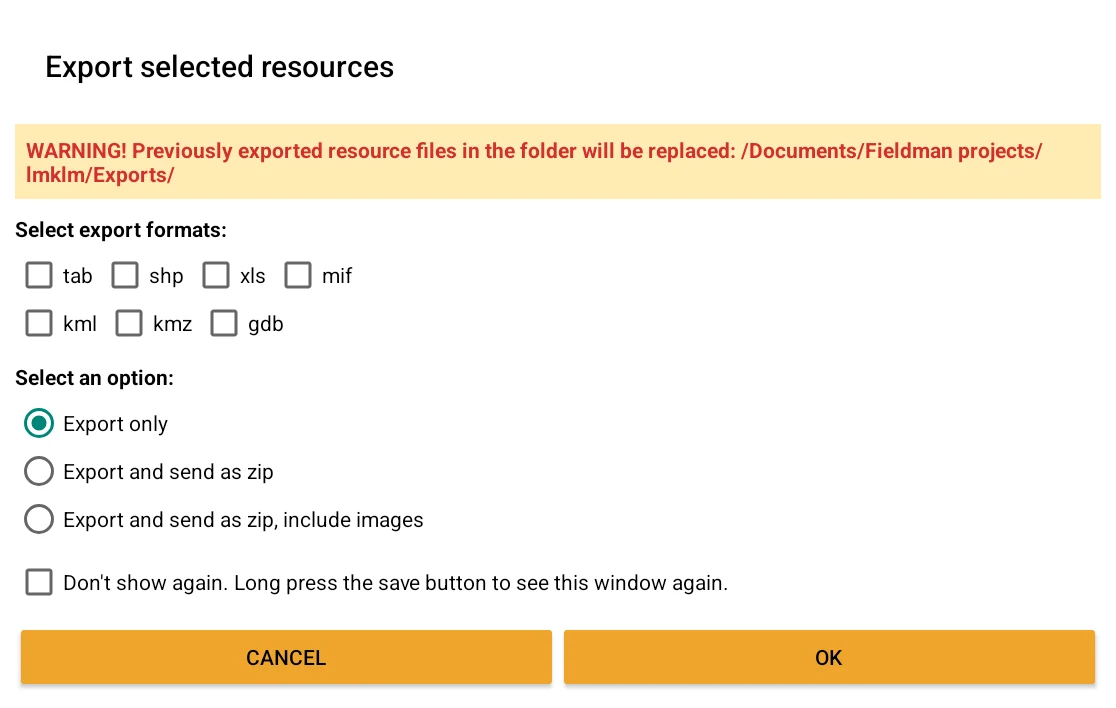
- **Destination folder:** By default, exports are saved in the Export subfolder of the project folder; you can change it by tapping the icon {.icon}.
- **Export format**: You can select one or more of the available formats - TAB, SHP, XLS/XLSX, **CSV**, MIF, KML, KMZ, GDB (ESRI Geodatabase, checked by default) and GPKG (GeoPackage). Each resource will be exported in each of the selected formats; with GDB, all selected tables are dumped together into a single exports/<project>.gdb folder (one layer per table) - with GPKG, in the same way, they are dumped together into a single exports/<project>.gpkg file. What each format keeps and what it loses is in Format specifications.
- **Apply dynamic style**: Some formats allow preserving styles. If this option is enabled, the dynamic style of the first layer where the table is used will be applied.
- Subsequent action:
- **Export only**: Exports the resources in the selected formats to the indicated folder.
- **Export and send as zip**: Compresses the exported files into a .zip and launches an action to send them through another application. Choosing this option reveals the **"Include in the zip:"** block below, with two independent checkboxes - **Include photos** and **Include audio** - and a **"Days to include:"** picker offering Today, 2 days, 3 days, 4 days, 5 days, 6 days, 7 days, 15 days, 30 days and All. The checkboxes are not mutually exclusive: you can add only the photos, only the audio, both or neither, and cap them by age so the file does not grow out of hand. "Today" counts from midnight of the current day, not from the current hour.
- **Do not show again**: If you check this box, the selected options will be set as default and will not be asked again. To change them later, hold down the export button.
While the export is running you'll see a dialog with the progress, and you can stop it at any time by pressing Back and confirming. When it finishes, a summary of the process is shown, with any errors and the changes that were made.
 Delete: Deletes the selected resources. This action cannot be undone.
 Add to map: Adds the selected resources as layers in the current activity (either on the map or in the strip log).
 New table: Creates an empty table from scratch. Opens the table editor to define its name, its attributes, and the projection.
Table editor
The table editor lets you create a new table or modify the structure of an existing table from within the application itself. It opens with the New table or Edit table actions of the Resource Manager and organizes the information into two tabs: Properties and Attributes.
When creating a new table, you can use a geocoder as a template by pressing the "Create from a geocoder" button and selecting one in the Geocoders manager. This way you'll pull in all its attributes and types, and if you haven't named the table yet, it will take the geocoder's name. If columns had already been added, you're first asked to confirm replacing them. If there's anything worth noting in the derived fields — two selectors asking for different types for the same column, or calculated columns, for which the editor only creates the base column — a notice lists every case.
In the Properties tab, the general characteristics of the table are defined:
- Name: name of the table in the database.
- Description: free text to describe the table.
- Coordinate dimensions: number of dimensions of the geometry's coordinates (for example, XY or XYZ).
- Projection: coordinate reference system (SRID) of the table. It can be changed with the edit button; when changed, the existing geometries are transformed automatically.
In the Attributes tab, the table's data columns are managed:
- The add button adds a new column, named Column N until you assign it a name.
- Each column has a name and a data type: integer, text, real, boolean, date and time, or decimal. Columns of the real type are shown but cannot be modified.
- Columns can be reordered by dragging them. There must be at least one attribute.
When saving, the application warns about operations that involve loss or transformation of data: deleting a column permanently removes that column and all its data; changing a column's type discards incompatible values; and changing the projection transforms the geometries. If the table is already in use, modifying its structure unassigns filters, dynamic styles, or geocoders that become incompatible, and it warns when a geocoder changed its fields. If you try to exit without saving, confirmation is requested.
Column names: recommendations and restrictions
It's worth choosing the name well from the start, since it's what the programs you export to will see, and it has to match the geocoder if you plan to assign one to the table later on:
- Short: Shapefile truncates names to 10 characters, so two long names that start the same way can reach the GIS looking confused. It's the only format with such a short limit (see Format specifications), but it's the most requested one, so it's worth writing with it in mind.
- No accents, ñ, or spaces: when exporting to TAB they're replaced with underscores, and when exporting to SHP they're removed. A name that already comes without them reaches every format unchanged.
- Matching the geocoder's, if the table is going to use one: names and types have to match to be able to assign it (see Geocoders).
When saving, the application rejects the name and explains why when it's empty or has leading or trailing spaces; exceeds 63 bytes (accented letters and ñ take up two); contains double quotes or non-printable characters; starts with fieldman_, a prefix reserved for internal columns; or repeats another column's name in the same table, case-insensitively.
You've read enough. Try it with your own project.
20 days free, with your data. If you get stuck: the manual — and us.
Secure payment with Stripe · Cancel anytime.