
Lithology, alteration, mineralisation and QA/QC: the logging tables
Pre-loaded tables linked by Hole ID and From/To: lithology, alteration, mineralisation, structure, sampling with QA/QC, geotechnics (RQD) and photos.
Lithology, alteration, mineralisation and QA/QC: the logging tables
Data browser
The data browser is located in the center of the screen. It shows the tuples of the table indicated in the layer menu, filtered by the drillhole active in the selector.
The first column is fixed and shows the tuple's label (configurable in the layer menu). The remaining columns show the table's attributes. Scroll horizontally to see all the columns.
When selecting a cell:
-
First column: Highlights the corresponding interval in the strip log.
-
Other columns: A context menu appears with the following options:
- Show details: Opens a window with all the tuple's attributes. Swipe left or right to navigate to the previous or next record.
- Edit attributes: Opens the geocoder to modify the tuple's fields, starting with the field of the tapped column.
- Delete: Deletes the tuple from the database. This action can be undone with the
 undo/redo button of the layer menu.
Holding the cell down (long touch) jumps straight to Edit attributes, skipping the menu.
Quick access buttons
The toolbar on the right side of the screen provides direct access to the most frequent logging operations:
- Configurable button bar: any layer can be added as a quick access button from the layer menu (see Add/Remove from button bar), with a label of up to 3 characters. The buttons are drawn above the add button (+), in the order of the layer list. A tap opens the geocoder to create a tuple in that layer; if the layer has Positioned GPS sampling active, the current position is also saved along with the record.
- + (add button): Opens the geocoder for the table currently selected in the layer menu.
- Zoom +/-: Adjust the visible depth range in the strip log. You can also use gestures over the strip or the depth ruler (see Strip Log).
Available tables
A drillhole project includes the following tables by default, all linked by Hole ID and the From / To fields:
- Lithology: Record of rock types, lithological units, and textual descriptions per interval.
- Alteration: Description of the types and intensities of hydrothermal or supergene alteration per interval.
- Mineralization: Record of ore minerals, textures, and visual grade estimates per interval.
- Structure: Structural observations recorded on the core, including type, angle, and description.
- Sampling: Record of the geochemical samples taken, with QA/QC data (standards, duplicates, blanks).
- Geotechnics: Geotechnical parameters such as core recovery, RQD, fracture count, and RMR classification.
- Downhole Data: Collar information (coordinates, azimuth, dip, total depth) and deviation surveys.
- Photos: Photographic record of the core, with association to specific depth intervals.
Tables can be added, renamed, or deleted from the Resource Manager according to the project's needs.
Core logging geocoders
Geocoders, in addition to the standard selectors (see Geocoders), have a special type of selectors for core logging: logging_id, logging_from, logging_to.
Geocoders are not created or edited from the application: they are defined in the geocoder editor spreadsheets provided by technical support (see the note at the end of Geocoders). What is described below corresponds to the configuration of those selectors within the spreadsheet; the full operation of the spreadsheets is documented separately, in the Geocoder Editor manual.
These must be assigned to the id, from, and to fields of the table, using the geocoder editor spreadsheet, similar to what is exemplified in the image:

These selectors are responsible for:
- Making the Hole ID, From and To fields mandatory and defining the position of the interval in the drillhole.
- The Hole ID field takes as its default value the last Hole ID entered.
- The From and To fields take by default the "To" value of the last interval recorded in that table for that drillhole, which allows continuous entry without gaps or overlaps.
The list of codes offered by the Hole ID selector is built from the logging tables configured in the project (identified by their collar role), not from a table with a fixed name. This prevents the selector from failing and showing the raw SQL query in a notice in projects where the collar table is named differently from the expected convention.
In the OPTIONS column you can enable or disable section overlap by setting "overlap":true. With this option enabled, if you enter an interval that overlaps with another already recorded, the new interval is stored as is and trims the range of those it overlaps, as shown in the image:
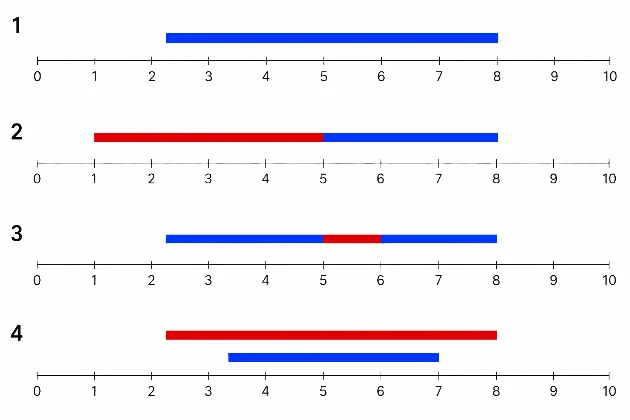
- Original section (blue).
- The new interval (red) enters at the head or the tail of the original: it trims the original.
- The new interval falls within the original: the original is duplicated and both copies are trimmed, one on each side of the new one.
- The new interval completely wraps the original: both are kept and you will have to manually delete the one that does not apply.
If "overlap":false or is not defined, the software will block the entry of overlapping sections.
Inserting an interval in a table without "overlap" enabled: this is the most common situation when you need to describe a new lithology in a stretch that already has data loaded. Since the software rejects overlap, you first have to edit (Edit attributes) the existing interval to shrink its range — changing its "To" if the new interval goes at the end, or its "From" if it goes at the start — and only then load the new interval into the gap that opened up. There is no way to "insert in the middle" that automatically splits the original interval unless the table has "overlap":true.
Sample_ID numbering and validation
In the Sampling table (and in any table of a geocoder that uses an ID selector with this same rule), the sample code field is typically validated with the prefix + 6 digits format (for example, MW000001); if the code already exists in the table, the geocoder warns that the sample is already in the database instead of saving it.
When creating a new tuple, the geocoder can suggest the next code by incrementing the last 6 digits of the last loaded code by one (MW000001 → MW000002), padding with leading zeros. This automatic suggestion only works if the code ends in exactly 6 digits; with a different digit count there is no suggestion, and the code has to be typed by hand.
⚠️ The duplicate check is case-sensitive: MW000001 and mw000001 are treated as different codes, because the expression engine has no function to normalize upper/lower case before comparing. Always enter the prefix with the same case convention (all uppercase or all lowercase) so duplicate detection works.
Sampling geocoders can also define conditionally required fields: a field is required only when another field in the same tuple takes a certain value (the typical case is the field that identifies what a QA/QC sample controls — duplicate, blank, or standard —, which is only filled in for that sample subtype). If a field is blank and won't let you save, check the values of the preceding fields in the tuple: the geocoder is probably requiring it under that rule. How that condition is set up in the spreadsheet is documented in the Geocoder Editor manual.
You've read enough. Try it with your own project.
20 days free, with your data. If you get stuck: the manual — and us.
Secure payment with Stripe · Cancel anytime.