
Vector layers, rasters and WMS basemaps in the field
Load vector tables, drone imagery, DEMs and WMS/WMTS/XYZ basemaps, and use them offline during the campaign.
Vector layers, rasters and WMS basemaps in the field
Vector or Table Layers

Each vector layer is associated with a table in the database. It is drawn on the map with its geometries and styles. In the layer menu, it appears as an item with a title (which may differ from the table name). A “•” symbol before the name indicates that it has selected tuples.
Below the title there are control icons:
 Vector layer type: If pressed once, the layer is selected as the target for new data and the icon will be highlighted
  . You may be asked to choose the geocoder that will be used to survey new data (see Geocoders). If held down, its table opens in the data grid (repeat to close the grid).
 Show/hide: A tap toggles visibility. If held down, only this layer in the group will be shown (configurable to affect only layers of the same type). Hold again to revert.
 Label: Shows or hides the layer's labels on the map (the descriptor of each tuple). A tap toggles their visibility; if the layer does not yet have a defined label, it opens the editor to select or create one. Holding it down always opens the label selector/editor. (see Labels).
 Filter: Enables or disables the filter. If none is defined, the corresponding dialog will open. You can also hold it down to edit it or select one directly. (see Filters).
 Snap (magnetic nodes): Lets you enable snap for all geometries. If held down, it is enabled only on this layer (repeat to revert). For more information, see the chapter on Map.
 Touchable layer: Defines whether geometries can be selected on the map. It also affects operations between geometries during editing. If held down, only this layer will be touchable (repeat to revert).(see Geometry Editor).
 Dynamic style: Enables or disables the dynamic style. If held down, you can create or select a new one.(see Dynamic Styles).
Tapping the layer name opens a menu with these options:
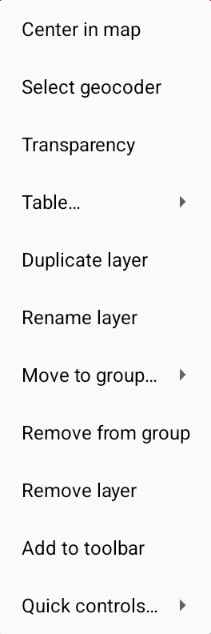
- Center onmap: moves it to the center of the layer.
- Select geocoder: Lets you choose which one will be used to survey the data in the intrinsic table.(see Geocoders).
- Transparency: Adjusts the layer's transparency on the map.
- Table submenu:
- Bulk table editors: opens the bulk editors manager. This tool applies the same operation to many rows of the table at once: recalculating attributes, copying rows to another table, or deleting the ones that meet a condition (see Bulk table editor).
- Transcribe: uses AI to transcribe all the table's audios at once. It only appears if the table has audio fields and an API key is configured (see Audio transcription in Geocoders).
- Displace all geometries: Opens a dialog to move all geometries by ΔX, ΔY, ΔZ, or by azimuth and dip.
⚠ WARNING: This action modifies the geometries in the database.
- Duplicate layer: Adds to the map a copy of the layer (same assigned filter, label, style, geocoder, and snap) pointing to thesame table. It does not duplicate the data or the table.
- Rename layer: Changes the visible name without affecting the table's name.
- Move to group: Opens a submenu to choose the target group, or create a new one with New group… (see Layer Groups). If the layer already belongs to a group, the item Remove from group also appears, which leaves it loose.
- Remove layer: Removes the layer from the map. This action does not delete the intrinsic table or its data, so you can add it again from the resource manager. (see Resource Manager).
- Add/Remove from button bar: Adds or removes a quick-capture button for this layer, drawn above the Sample button in the map area. When creating it, you choose the button's action (current coordinate, point, line, polygon, or just select the layer) and optionally a label of up to 3 characters. A short tap runs the action; a long one opens the button editor to change the action, the label, or remove it.
- Quick controls submenu: Brings together, in one place, the same controls as the icons below the layer title (show/hide, snap, filter, label, dynamic style, touchable layer, show data).
Raster Layers
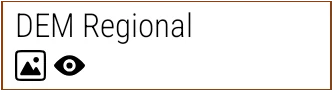
Each raster layer is associated with a georeferenced image (GeoTiff, JPG, JPEG2000, etc.). In the menu it is shown with a representative title (which may differ from the raster's name).
When importing or opening an image as a raster layer, the application detects and applies its georeference (projection and location) automatically, without user intervention, and records the raster's actual SRID in the project.
It recognizes georeferencing embedded in TIFF/GeoTIFF —including BigTIFF files and embedded WKT citations (PROJCS/GEOGCS/PROJCRS)—, in world files (.tfw/.jgw/.wld), in associated .prj files, in GDAL/PAM metadata, in Surfer/GeoSoft .grd files, and in ECW/ERDAS; also in the manual georeferencing files .points from QGIS and .map from OziExplorer (with WGS84, SAD69, or Campo Inchauspe datum). A KML/KMZ containing an overlaid image (GroundOverlay) can also be imported as a georeferenced raster layer: the application places the image according to the geographic rectangle defined in the KML. If georeferencing information is not detected through any of these means, the import does not complete and “Raster without projection data” is reported.
⚠️ Size limit on JPEG2000 and ECW: the library that decodes these two formats supports rasters of up to 1 gigapixel; a larger image won't open and the app reports it ("the library only allows rasters of up to 1 gigapixel"). GeoTIFF doesn't have this format-specific limitation (it's only bound by the device's memory), so for large rasters prefer GeoTIFF over JP2/ECW.
Below there are control icons:
 Raster layer type: informational icon.
 Show/hide: A tap toggles visibility. If held down, only this layer in the group will be shown (configurable to affect only layers of the same type).
Pop-up menu:
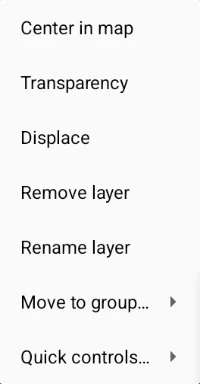
- Center on map: Moves it to the visible position of the layer (center of the raster or upper left corner).
- Transparency: Adjusts the layer's transparency on the map.
- Displace raster: Opens a dialog to move the raster by ΔX, ΔY, ΔZ, or by azimuth and dip.
- Remove layer: Removes the layer from the map. This action does not delete the intrinsic raster, so you can add it again from the resource manager. (see Resource Manager).
- **Rename layer and Move to group:**have the same function as in vector layers.
- Quick controls submenu: Brings together, in one place, the same controls as the icons below the layer title (show/hide).
Basemap Layers (WMS, WMTS and XYZ)
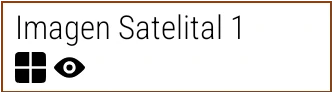
Each basemap layer is associated with an internet map service —WMS (Web Map Service), WMTS, or XYZ tiles—, which provides image tiles to the map. In the menu they are listed with a title that may differ from the service's intrinsic name.
The project's base template already includes a set of ready-to-use basemap layers —satellite imagery, street maps, shaded relief, and physical maps (OpenStreetMap, Esri Satellite, Esri Relief, Esri Streets, Esri Physical, among others)—, which are added to the map from the Resource Manager like any other resource (see Resource Manager).
You can also register your own server by entering the service URL, either in WMTS format or as an XYZ tile template (with the {z}, {x}, and {y} markers). Each basemap layer carries its associated attribution, which is shown over the map as most of these services require.
Below there are control icons:
 WMS layer type: informational icon.
 Show/hide: A tap toggles visibility. When it becomes visible, the rest of the basemap layers are automatically hidden.
Pop-upmenu:
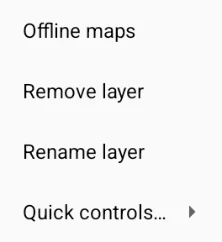
- Offline maps: Downloads the visible map area to internal memory for a set period. (see Offline maps).
- Remove layer: Removes the layer from the map. This action does not delete the reference to the intrinsic service, so you can add it again through the resource manager. (see Resource Manager).
- Rename layer: Changes the visible name without affecting the service's name.
- Quick controls submenu: Brings together, in one place, the same controls as the icons below the layer title (show/hide).
You've read enough. Try it with your own project.
20 days free, with your data. If you get stuck: the manual — and us.
Secure payment with Stripe · Cancel anytime.