
Offline geological mapping: map, layers and layer memories
How the surface mapping module works with no signal: the layer menu, layer memories and groups to organise your project.
Offline geological mapping: map, layers and layer memories
Surface Survey
The interface has been designed with specialized components to manage large amounts of information on small touch screens while maintaining usability.
This activity lets you draw geological maps, record structures and geochemical samples, and perform other cartographic tasks.
It has a map capable of rendering raster image layers (local files, DEMs, or WMS) or database tables with georeferenced vector features (multipoints, polylines, and polygons). Styles can be applied to the latter, either embedded as an attribute in the table or through rules based on other attributes of the tuple (see Styles).
Each layer can be referenced in any geographic system, either with an SRID (Spatial Reference System Identifier) definition or a user-defined local one (proj4 system). The map can also project in any of the mentioned systems, at any scale. (see Projection).
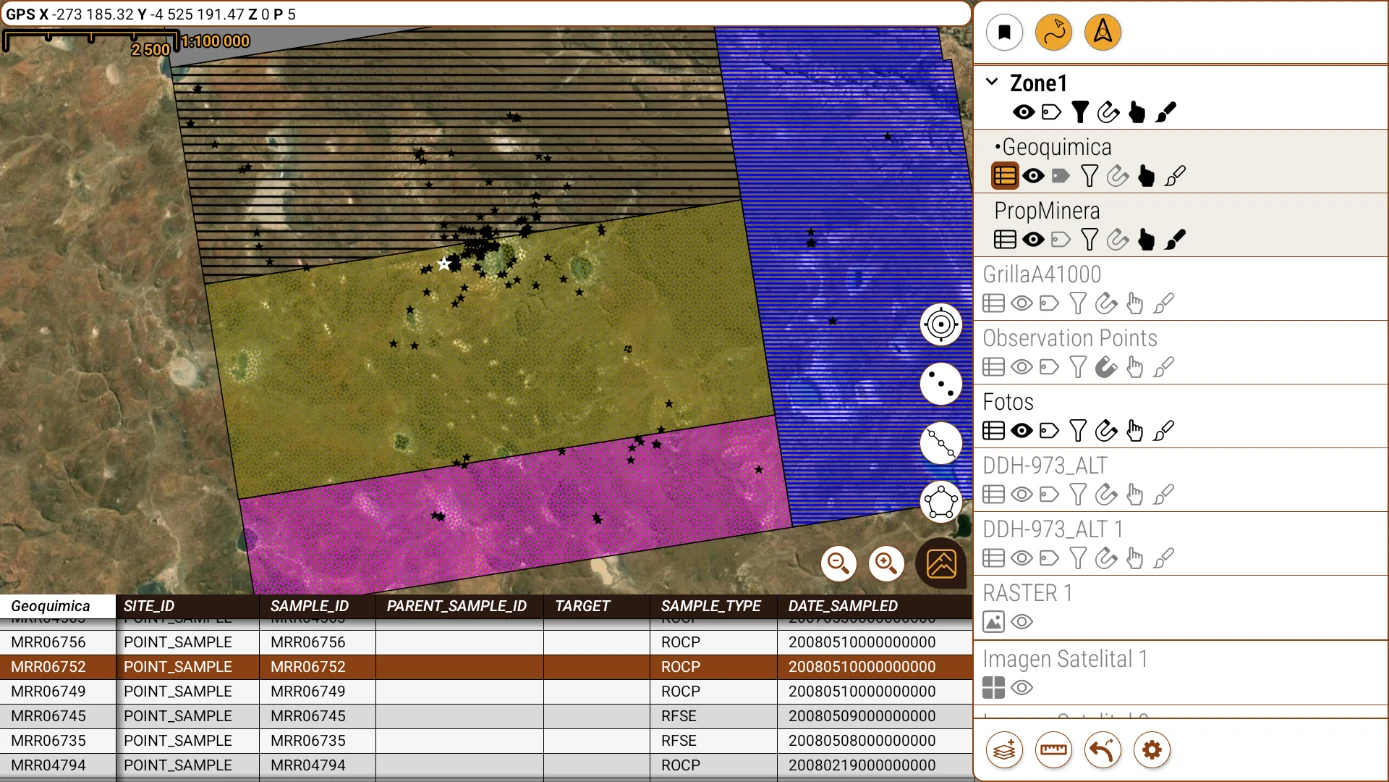
The screen includes: a map, a button cluster in the lower right, a top status bar, a layer menu, and, below it, a table browser.
Main Button
 This button serves several functions:
- Dragging it to the left shows the layer menu; dragging it up displays the data grid. You can also use the fling gesture to fully open or close these sections, or press the Back key to close them.
- Pressing it once hides some interface elements and makes others transparent to improve map visibility.
- Pressing it twice, if GPS coordinates are available, will center the map on the current position.
Layer Menu
The layer menu can be shown or hidden using the main button. The following image numbers its elements:
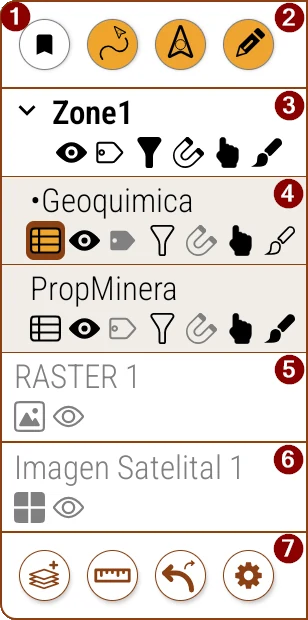
1 Layer Memories: bookmark-shaped button. It saves combinations of the layers' state - visibility, snap, clickable, label, filter, dynamic style and transparency, whichever you choose - to reapply them with one tap; detailed below.
2 Special Layers: Located horizontally at the top, they let you control specific map layers, such as the position pointer, the tracks, and the cosmetic layer (geometries currently being edited).
3 Groups: user layers can be organized into collapsible groups; detailed in Layer Groups.
4 and 5 User Layers: a scrollable list, below the special layers, where the user adds vector tables and rasters. The topmost layers are the last to be drawn; they are reordered by holding down their title and dragging them to a new position. A layer can belong to a group (4) or be loose, outside any group (5).
6 Basemap layers: Second section of the scrollable list. It works the same as the previous one but contains exclusively basemap layers served over the internet (WMS, WMTS, or XYZ tiles).
7 Settings and tools: Fixed buttons at the bottom to add or manage resources, measure on the map, undo and redo actions, and access settings.
Layer Memories
 Saves the state of the layers to reapply it when needed. Each map has up to nine memories (slots), numbered 1 to 9.
To record a memory, hold down the button and choose 💾 Set memory, at the end of the menu. The app asks for an optional description and which properties to include, and saves the current state of all layers and groups in the active slot. The properties are Visibility, Snap, Clickable (touchable) and Transparency, plus Label, Filter and Dynamic style - these three with two independent checkboxes each: whether it is on or off, and which resource (label, filter or style) is assigned. Tick only the ones you want to memorise: the ones you leave unticked stay as they are when the memory is applied.
A short tap applies the active slot's memory; tapping the button again restores the previous state, so it works as a quick undo. The number shown on the button indicates the slot in use. If the active slot is empty, the short tap records it: it saves the current state with Visibility, Snap and Clickable, without a description, and the app confirms with "Memory N saved".
The nine slots are listed directly in that same menu (hold down the button): each one is numbered and shows the description you gave it, or "Slot" if you didn't set one; those that already have a saved memory are marked with a dot. Choosing a slot with a memory from the list makes it active and applies it right away (a tap on the button undoes it); choosing an empty one only makes it active, ready to record.
Memories are saved inside the project, not on the device: each project has its own and they travel with it.
Layer Groups
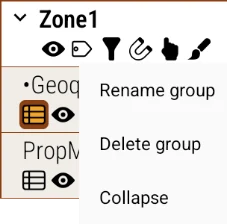
Overlapping layers can be organized into collapsible groups. To create a group, use the Move to group… option in the layer menu and choose Move to new group…: the group is created and the layer is placed inside it. To move a layer to an existing group, drag it below the header of an expanded group or use Move to group… / Remove from group.
Tapping a group's header opens its menu, with options to Rename group, Delete group, Collapse/Expand, and Show only this group. The arrow on the header collapses or expands the group without opening the menu.
The header also shows the same buttons as the layers (visibility, filter, label, style, snap, selectable), but acting on all layers in the group at once. Each button has three states: all on, mixed, or all off; tapping it turns them on or off as a block.
Special Layers
 Tracks: Shows a menu with options to show/hide the tracks layer, view the data in the grid, center the map, edit filters, and prevent its elements from being selectable. It also allows recording GPS coordinates in real time, through a service that stays active even in the background. An icon in the notification area lets you stop the capture (also from the button's menu). Tracks are stored in the “Tracks” table, which must not be deleted.
 Current position cursor: Shows/hides the cursor. If the device has a compass, the cursor will point to the magnetic north reported by the hardware. If it does not have one, or if it moves faster than 2 m/s, it will orient according to the GPS heading.
 Geometry being edited: Only visible while editing a geometry. It lets you show or hide it.
If track recording keeps cutting off on its own, or if the GPS doesn't get a fix, see Troubleshooting: in most cases it's Android's restrictions on background services and location permissions, not a failure of the application.
You've read enough. Try it with your own project.
20 days free, with your data. If you get stuck: the manual — and us.
Secure payment with Stripe · Cancel anytime.